2022. 4. 30. 11:16ㆍFrontend

Overview
Nextjs가 편리한 점은 웹 사이트 최적화를 위해 고려해야 하는 여러 가지 사항들을 대부분 "미리" 고려해서 default 옵션으로 제공해 주고 있다는 것입니다. 이번 포스팅에서는 Nextjs에서 웹 사이트 최적화를 위해 제공하는 기능 중의 하나인 Next/Image 가 내부적으로 어떻게 동작하는지에 대해 살펴보려고 합니다. 공식 문서에서 찾아볼 수 있는 내용들은 포함되어 있지 않으며, 실제로 nextjs 라이브러리가 어떻게 구현되어 있는지를 소스 코드를 기준으로 설명합니다.
Image Optimization
next/image 를 사용하려면 html의 img 태그 대신에 다음과 같이 next/image를 import 해서 사용하면 됩니다. 사용법이 굉장히 간단하고, next/image를 사용하기만 하면 기본적으로 optimize 옵션이 활성화가 됩니다. 만약(그럴 일이 거의 없을 것 같지만) next/image를 사용하면서 이미지 최적화 옵션을 모종의 이유로 인해 꺼야 한다면 unoptimized 옵션을 명시적으로 주어야 합니다.
import Image from 'next/image';

<Image
  src="/sunset1.jpg"
  alt="Sunset"
  width={600}
  height={450}
  layout="fixed"
  // unoptimized={true}
/>
image optimization 옵션이 활성화된 경우, 이미지의 URL은 원본 이미지의 url이 아닌 nextjs에서 생성한 다음과 같은 포맷이 됩니다. 실제로 이미지는 ${YOUR_DOMAIN}/static/~ 에 위치해 있지만, 브라우저에서 이 이미지를 바로 가져다 사용하는 것이 아니라 nextjs 서버로 이미지의 실제 주소와 함께 요청해서 이미지를 최적화하는 과정을 거치는 것입니다.
${YOUR_DOMAIN}/_next/image?url=%2F_next%2Fstatic%2Fmedia%2Ftop_img.80c2bb29.svg&w=828&q=75
실제로 Nextjs에서 /_next/image 로 요청이 들어오면 다음 코드를 내부적으로 실행하며 imageOptimizer라는 함수를 내부적으로 실행한 결과물을 리턴해주는 것을 확인할 수 있습니다. (핵심을 설명하기 위해 코드의 많은 부분을 생략했습니다.)
  protected generateImageRoutes(): Route[] {
    return [
      {
        match: getPathMatch('/_next/image'),
        type: 'route',
        name: '_next/image catchall',
        fn: async (req, res, _params, parsedUrl) => {
          try {
            const cacheEntry = await this.imageResponseCache.get(
              cacheKey,
              async () => {
                const { buffer, contentType, maxAge } =
                  await this.imageOptimizer(
                    req as NodeNextRequest,
                    res as NodeNextResponse,
                    paramsResult
                  )
              },
              {}
            )

            sendResponse(...)
https://github.com/vercel/next.js/blob/canary/packages/next/server/next-server.ts#L175
GitHub - vercel/next.js: The React Framework
The React Framework. Contribute to vercel/next.js development by creating an account on GitHub.
github.com
Width & Quality Parameters
${YOUR_DOMAIN}/_next/image?url=%2F_next%2Fstatic%2Fmedia%2Ftop_img.80c2bb29.svg&w=828&q=75위의 URL을 보면 nextjs에서 url을 생성할 때, w, q 2개의 쿼리 파라미터를 추가로 전달하고 있는 것을 확인할 수 있습니다. 여기서의 width는 가져올 이미지의 width를 의미하고, q는 quality, 즉 이미지를 얼마만큼 최적화해서 전달할 것인지를 의미합니다. (이 수치가 낮을수록 용량은 작아지지만 이미지의 화질은 저하됩니다.)
// next.config.js
module.exports = {
  images: {
    deviceSizes: [640, 750, 828, 1080, 1200, 1920, 2048, 3840],
  },
}
w=828이라는 수치는 별도로 설정하지 않았다면 아래의 Default Config에서 가져온 값으로, 실제로 브라우저의 viewPort나, 실제로 렌더될렌더 될 이미지의 크기에 대해서 아래 deviceSizes의 배열에 있는 숫자들 중 "가장 가까운" 숫자들로 가져오게 됩니다. 즉 실제로 브라우저에서 이미지가 렌더 될 공간이 810px 정도라고 한다면, _next/image로 요청을 보낼 때, deviceSizes에 있는 배열의 숫자들 중 810px과 가장 가까운 수치인 828을 width 파라미터로 설정해서 보내게 되는 것입니다. 이 값은 next.config.js의 "images" 필드에서 추가로 설정할 수 있습니다.
export const imageConfigDefault: ImageConfigComplete = {
  deviceSizes: [640, 750, 828, 1080, 1200, 1920, 2048, 3840],
  imageSizes: [16, 32, 48, 64, 96, 128, 256, 384],
  path: '/_next/image',
  loader: 'default',
  domains: [],
  disableStaticImages: false,
  minimumCacheTTL: 60,
  formats: ['image/webp'],
  dangerouslyAllowSVG: false,
  contentSecurityPolicy: `script-src 'none'; frame-src 'none'; sandbox;`,
}
https://github.com/vercel/next.js/blob/canary/packages/next/shared/lib/image-config.ts#L52
GitHub - vercel/next.js: The React Framework
The React Framework. Contribute to vercel/next.js development by creating an account on GitHub.
github.com
Acceptable Formats
next/image를 사용하면, 실제로 static asset에 저장된 파일은 PNG, JPG이지만, 브라우저에 내려온 파일은 WebP와 같이 "다른 형태의" 파일인 경우가 있습니다. 이는 next/image에서 이미지 최적화를 할 때, 브라우저가 WebP와 같은 이미지 최적에 더 용이한 포맷을 지원하는 경우, 포맷을 변환해서 내려주기 때문입니다.
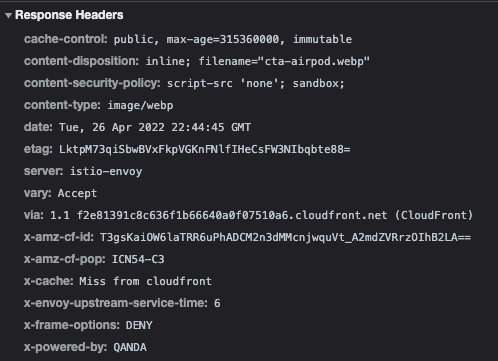
브라우저로부터 _next/image로 이미지 최적화 요청이 들어오면 nextjs 서버는 우선 이 요청의 request 헤더를 보고, 해당 브라우저가 "image/webp"등과 같은 포맷을 지원하는지 여부를 확인합니다.
const mimeType = getSupportedMimeType(formats || [], req.headers['accept'])
...
function getSupportedMimeType(options: string[], accept = ''): string {
  const mimeType = mediaType(accept, options)
  return accept.includes(mimeType) ? mimeType : ''
}
If the Accept head matches more than one of the configured formats, the first match in the array is used. Therefore, the array order matters. If there is no match (or the source image is animated), the Image Optimization API will fallback to the original image's format.
GitHub - vercel/next.js: The React Framework
The React Framework. Contribute to vercel/next.js development by creating an account on GitHub.
github.com
GitHub - vercel/next.js: The React Framework
The React Framework. Contribute to vercel/next.js development by creating an account on GitHub.
github.com
이렇게 해당 브라우저(e.g Chrome)가 image/webp를 지원하는 경우, nextjs는 sharp라는 node 라이브러리를 사용해서 이미지를 WEBP로 변환해서 리턴하게 됩니다. SVG의 경우 Rasterize 이미지가 아니기 때문에 별도로 변환하지 않고 SVG 포맷 그대로 내려주도록 처리하고 있습니다.
if (sharp) {
  // Begin sharp transformation logic
  const transformer = sharp(upstreamBuffer)

  transformer.rotate()

  const { width: metaWidth } = await transformer.metadata()

  if (metaWidth && metaWidth > width) {
    transformer.resize(width)
  }

  if (contentType === AVIF) {
    ...some logic
  } else if (contentType === WEBP) {
    transformer.webp({ quality })
  } else if (contentType === PNG) {
    transformer.png({ quality })
  } else if (contentType === JPEG) {
    transformer.jpeg({ quality })
  }
}GitHub - vercel/next.js: The React Framework
The React Framework. Contribute to vercel/next.js development by creating an account on GitHub.
github.com
Wrapper Elements
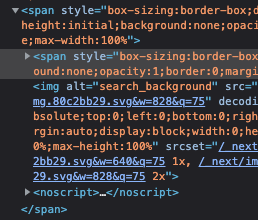
next/image를 사용해서 이미지를 렌더링하면 단순 img 태그를 사용했을 때와는 다르게 몇 가지 독특한 현상을 확인할 수 있습니다. 그중 첫 번째는 기본적으로 img 태그를 사용하기는 하지만, img 태그 바깥에 span을 Wrapper Element로 추가한다는 것입니다. 이는 "better positioning, sizing, and scaling of the image on the page"라고 설명되어 있으며, CLS(Cumulative Layout Shift)등을 최대한 방지하기 위해 의도적으로 넣은 옵션이라고 풀이됩니다. 따라서 next/image를 사용해서 span안에 있는 img 태그를 styling 하고 싶을 경우, className property를 해당 컴포넌트에 넣어서 class selector를 사용해서 스타일을 주입해야 합니다.
<Image
  src="/sunset1.jpg"
  alt="Sunset"
  width={600}
  height={450}
  className={"someClassName"}
/>
https://nextjs.org/docs/basic-features/image-optimization#styling
Basic Features: Image Optimization | Next.js
Next.js supports built-in image optimization, as well as third party loaders for Imgix, Cloudinary, and more! Learn more here.
nextjs.org
'Frontend' 카테고리의 다른 글
| 모노레포의 문화적 의의 (0) | 2022.05.30 |
|---|---|
| 코드 리뷰 문화에 대한 고찰 (1) | 2022.05.05 |
| [Web.dev] Fast (3) - Image Optimization (0) | 2022.04.30 |
| [Web.dev] Fast (2) - Performance Budget (0) | 2022.04.22 |
| [Web.dev] Fast (1) - Introduction (0) | 2022.04.15 |