2023. 1. 15. 17:22ㆍFrontend

Overview
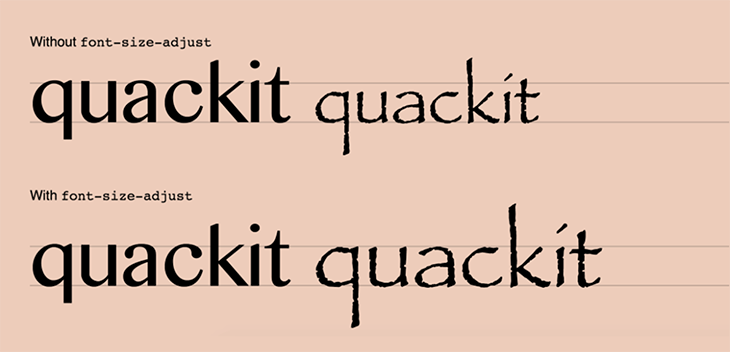
@next/font includes built-in automatic self-hosting for any font file. This means you can optimally load web fonts with zero layout shift, thanks to the underlying CSS size-adjust property used.
This new font system also allows you to conveniently use all Google Fonts with performance and privacy in mind. CSS and font files are downloaded at build time and self-hosted with the rest of your static assets. No requests are sent to Google by the browser. - next.js official docs
next13이 소개되면서 @next/font라는 패키지가 새롭게 추가되었습니다. @next/font 패키지에는 빠른 font loading, 그리고 zero-layout shift를 지원하기 위한 adjustFallbackFont 등의 기능이 들어 있어서 사용자에게 네트워크 환경과 상관없이 최대한 일관적인 UX경험을 제공하는데 초점을 맞추고 있습니다.
지원하는 기능과 API에 대한 설명은 아래 Reference 섹션에 있는 next/font 공식 문서에서 최신의 문서를 살펴보시는 것이 좋으며, 이번 포스팅에서는 @next/font가 어떤 방식으로 폰트 최적화를 지원하는지에 대한 내용을 Source Code Level에서 간단하게 살펴보도록 하겠습니다. (FYI. @next/font는 @next/font/google과 @next/font/local이 있는데, 두 패키지 모두 동작원리는 비슷하고, 대부분의 프로젝트가 @next/font/google을 사용할 것으로 예상되므로, 이번 포스팅에서는 @next/font/google에 대해서만 다루도록 하겠습니다.)
Examples
소스 코드로 들어가 보기 전에, 실제로 기존 Next12에서의 폰트 로드와 Next13에서의 폰트 로드가 어떻게 바뀌었는지 실제 예시를 통해 살펴보도록 하겠습니다. 똑같이 32px이라는 font-size를 주더라도 폰트마다 실제로 렌더링 되는 사이즈가 조금씩 다르기 때문에 이 차이점을 잘 부각해 줄 수 있는 손글씨 폰트인 "Homemade Apple"이라는 Google Font를 통해 예시를 만들었습니다. 그리고, Layout Shift가 일어나는지의 여부를 확인하기 위해 텍스트 아래에 image component를 두어 실제로 이미지가 폰트 로딩에 따라 밀려나는지 여부를 확인할 수 있도록 예제를 구성했습니다. 예제 코드는 다음과 같습니다.
Next 12 Test Code
import Head from 'next/head'
import Image from 'next/image';
import Cat from '../assets/images/cat.jpg';

export default function Home() {
  return (
    <div>
      <Head>
        <title>Font Test</title>
        <meta name="description" content="Font Test" />
        <link rel="icon" href="/favicon.ico" />
        <link rel="preconnect" href="https://fonts.googleapis.com"/>
        <link rel="preconnect" href="https://fonts.gstatic.com" crossorigin/>
        <link href="https://fonts.googleapis.com/css2?family=Homemade+Apple&display=swap" rel="stylesheet"/>
      </Head>
      <main>
        Homemade Apple Font (Next 12)
        <Image src={Cat} alt="cat"/>
      </main>
    </div>
  )
}
Next 13 Test Code
import { Homemade_Apple } from '@next/font/google';
import Image from 'next/image';
import Cat from '../assets/images/cat.jpg';

const homemadeApple = Homemade_Apple({ subsets: ['latin'], weight: ['400'], display: 'swap' })


export default function Home() {
  return (
    <main className={homemadeApple.className}>
      Homemade Apple Font (Next 13)
      <Image src={Cat} alt="cat"/>
    </main>
  )
}
Zero Layout Shift
우선은 Layout Shift에 관한 내용입니다. font-size를 동일하게 맞춰도, 각각의 폰트가 기본적으로 가지고 있는 크기가 조금씩 다르기 때문에 서로 다른 폰트를 교체하는 과정에서 Layout Shift가 발생합니다. (이를 FOUT, Flash Of Unstyled Text라고 합니다.) Next 12에서는 이에 대해 별다른 처리를 하고 있지 않기 때문에 아래 왼쪽의 그림처럼, Homemade Apple 폰트가 로드되기 전에 기본적으로 보여주는 Font와 로드된 폰트의 크기가 달라서 폰트가 로드된 이후에 image가 아래로 밀려나는 Layout Shift가 발생하고 있는 것을 확인할 수 있습니다.
반면, Next 13에서는 이를 adjustFallbackFont라는 기능을 통해 기존 Fallback Font의 size-adjust 속성을 조정하기 때문에 Fallback 폰트와 Homemade Apple 폰트 사이의 크기 차이가 발생하지 않고, 이에 따라 Layout Shift가 발생하지 않고 있음을 확인할 수 있습니다.
 |
 |
pre-download google font
두 번째로는 google font를 다운로드하는 시점에 대한 것입니다. 기존 next12를 보면 html파일이 로드된 후, 이 파일이 link 하고 있는 font.googleapis.com에서 폰트를 다운로드하고 있음을 확인할 수 있습니다.


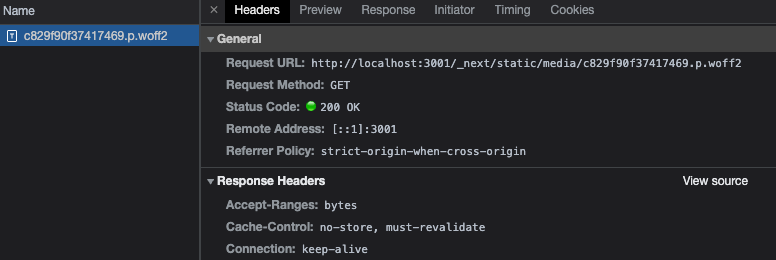
반면, Next 13에서는 build 타임에 미리 google font를 다운로드하여서 로컬 디렉터리에 저장해 두고, html 파일이 이 로컬 파일을 link 하도록 구현되어 있습니다. 이렇게 하면 서로 다른 도메인 간 Connection 연결을 위한 handshaking 과정 없이, 이미 HTML 파일을 다운로드하기 위해 생성했던 Connection을 그대로 사용할 수 있기 때문에 전자보다 비교적 빠른 속도로 파일을 다운로드할 수 있습니다. (물론 Next.js 서버를 운영하는 쪽에서 적절하게 CDN을 사용해서 캐시 정책을 설정해주어야 할 것입니다.)


Webpack Loader
지금까지 Next13 이미지가 어떤 특징을 지니는지에 대해 Example을 통해 살펴보았습니다. 이제부터는 본격적으로 Source Code를 살펴보면서 위의 기능들을 어떻게 구현했는지에 대해 알아보도록 하겠습니다. 가장 먼저 살펴볼 부분은 webpack-loader입니다. loader는 우리가 아래와 같이 코드를 입력했을 때, 이를 실제 Next가 사용하기 위한 형태로 변환해 주는 역할을 합니다.
const homemadeApple = Homemade_Apple({ subsets: ['latin'], weight: ['400'], display: 'swap' })
next 프로젝트의 webpack-config.ts 파일을 보면 다음과 같이 next에서 사용하는 여러 로더들을 빌드 타임에 사용하고 있음을 알 수 있습니다. 우리에게 익숙한 next-swc-loader, next-image-loader등이 여기에 적혀 있고, 오늘 포스팅의 주제인 next-font-loader도 여기에 들어 있음을 확인할 수 있습니다. 이 loader string은 path.join을 통해 참조되며, 해당 path를 resolve 하면 /packages/next/build/webpack/loaders/next-font-loader를 참조하게 됩니다.
// packages/next/build/webpack-config.ts/getBaseWebpackConfig
...
resolveLoader: {
  // The loaders Next.js provides
  alias: [
    'error-loader',
    'next-swc-loader',
    'next-client-pages-loader',
    'next-image-loader',
    'next-serverless-loader',
    'next-style-loader',
    'next-flight-loader',
    'next-flight-client-entry-loader',
    'noop-loader',
    'next-middleware-loader',
    'next-edge-function-loader',
    'next-edge-ssr-loader',
    'next-middleware-asset-loader',
    'next-middleware-wasm-loader',
    'next-app-loader',
    'next-font-loader',
  ].reduce((alias, loader) => {
    // using multiple aliases to replace `resolveLoader.modules`
    alias[loader] = path.join(__dirname, 'webpack', 'loaders', loader)

    return alias
  }, {} as Record<string, string>),
  modules: [
    'node_modules',
    ...nodePathList, // Support for NODE_PATH environment variable
  ],
  plugins: [],
},
next-font-loader는 다음과 같이 2개의 구성요소로 구성되어 있습니다. 실제로 webpack loader가 참조하는 index.ts와 이 index.ts파일에서 참조하는 postcss-next-font.ts 입니다. 각각의 파일이 어떻게 구성되어 있는지를 살펴보도록 하겠습니다.

nextFontLoader
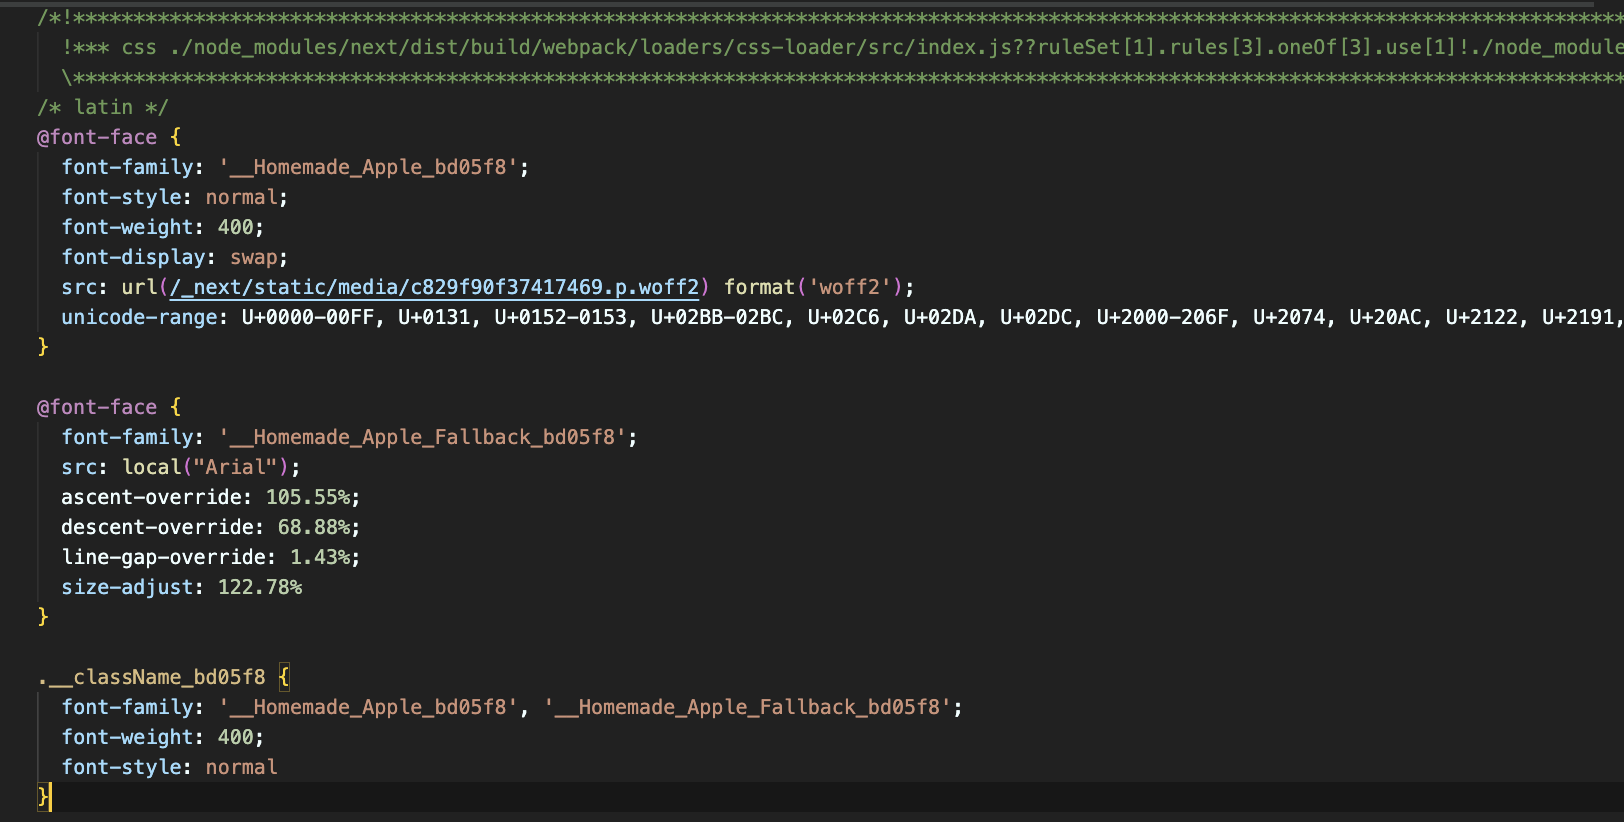
next-font-loader는 크게 2가지 부분으로 구성되어 있습니다. packages/font/src/google/loader.ts의 downloadGoogleFonts 함수를 호출해서 빌드 타임에(애초에 webpack loader가 실행되는 시점은 빌드 타임이기 때문입니다.) googleFont를 다운받고 zero-layout-shift를 위한 size-adjust를 진행하는 부분과 이 결과를 바탕으로 className을 만들고 여기에 font-family, font-weight, font-style css를 적용하는 부분입니다. 실제로 위의 Next13 예제에서 Homemade Apple 폰트를 적용한 main tag에는 다음과 같은 className이 적용되어 있는 것을 확인할 수 있으며, 이 className은 아래와 같은 css가 적용됩니다.


우선 googleFont를 다운로드 받고, fallback font를 처리하는 단계부터 살펴보도록 하겠습니다. nextFontLoader라는 함수에서 fontLoader라는 async 함수를 호출함으로써 이 단계를 수행하게 되는데 fontLoader라는 함수는 googleFont의 경우 pakages/font/google/loader.js를 의미하게 되며, 이는 packages/font/src/google/loader.ts를 빌드한 결과물이 됩니다. 즉, nextFontLoader에서 호출하는 fontLoader라는 함수는 packages/font/src/google/loader.ts의 downloadGoogleFonts라는 함수를 의미하는 것입니다.
export default async function nextFontLoader(this: any) {
...
    try {
      const fontLoader: FontLoader = require(path.join(
        this.resourcePath,
        '../loader.js'
      )).default
      let { css, fallbackFonts, adjustFontFallback, weight, style, variable } =
        await fontLoader({
          functionName,
          variableName,
          data,
          config: fontLoaderOptions,
          emitFontFile,
          resolve: (src: string) =>
            promisify(this.resolve)(
              path.dirname(
                path.join(this.rootContext, relativeFilePathFromRoot)
              ),
              src.startsWith('.') ? src : `./${src}`
            ),
          isDev,
          isServer,
          loaderContext: this,
        })

...
}
downloadGoogleFonts
downloadGoogleFonts라는 함수는 230줄에 달하는 굉장히 긴 함수이므로, Semantic 한 부분을 기준으로 나누어서 설명하도록 하겠습니다. 전체 Source Code는 official repository를 참고하시는 것이 좋습니다. 이 글에서는 fallback font의 size-adjust를 수행하는 부분, 폰트를 다운로드 하는 부분, 그리고 결과를 생성하는 부분의 3군데로 나누어서 설명하도록 하겠습니다.
https://github.com/vercel/next.js/blob/canary/packages/font/src/google/loader.ts
GitHub - vercel/next.js: The React Framework
The React Framework. Contribute to vercel/next.js development by creating an account on GitHub.
github.com
size-adjust
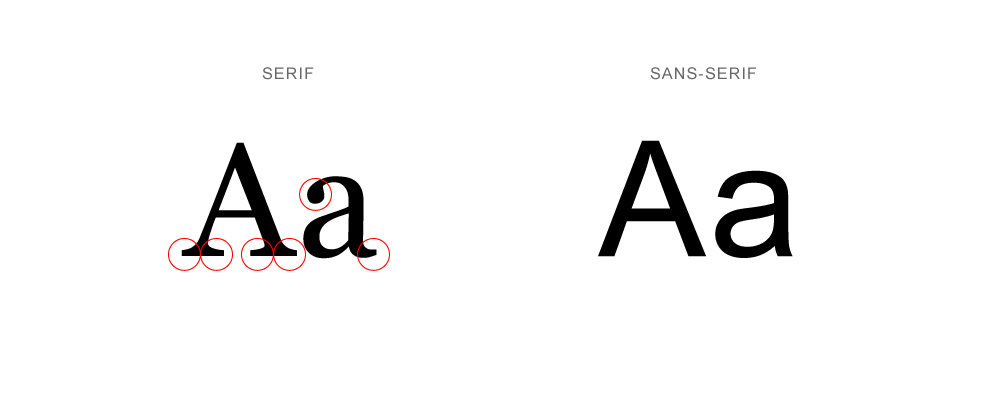
첫 번째로 거치는 단계는 adjustFontFallbackMetrics를 계산하는 부분입니다. google-font-metrics.json이라는 Map을 불러와서 fontFamily를 key로 준 값을 읽어온 후에, 이 값을 calculateSizeAdjustValues에 넣어 size-adjust, line-gap 등의 fallback font를 조정하기 위한 값을 계산하고 있음을 알 수 있습니다. 이 부분은 next/font가 zero-layout-shift를 구현하기 위한 핵심 로직으로, 내가 Homemade Apple 폰트를 사용하기로 결정했다고 하면, 이 폰트에 대한 fallback font를 결정한 뒤에(serif or sans-serif), Homemade Apple 폰트와 fallback 폰트와의 layout shift를 발생시킬 수 있는 size 차이를 비교해서 size-adjust 속성을 조정하는 방식으로 동작합니다.

The size-adjust CSS descriptor defines a multiplier for glyph outlines and metrics associated with this font. This makes it easier to harmonize the designs of various fonts when rendered at the same font size.
size-adjust - CSS: Cascading Style Sheets | MDN
The size-adjust CSS descriptor defines a multiplier for glyph outlines and metrics associated with this font. This makes it easier to harmonize the designs of various fonts when rendered at the same font size.
developer.mozilla.org
// Find fallback font metrics
let adjustFontFallbackMetrics: AdjustFontFallback | undefined
if (adjustFontFallback) {
try {
  const { ascent, descent, lineGap, fallbackFont, sizeAdjust } =
    calculateSizeAdjustValues(
      require('next/dist/server/google-font-metrics.json')[fontFamily]
    )
  adjustFontFallbackMetrics = {
    fallbackFont,
    ascentOverride: `${ascent}%`,
    descentOverride: `${descent}%`,
    lineGapOverride: `${lineGap}%`,
    sizeAdjust: `${sizeAdjust}%`,
  }
}
...
}

const result = {
    fallbackFonts: fallback,
    weight:
      weights.length === 1 && weights[0] !== 'variable'
        ? weights[0]
        : undefined,
    style: styles.length === 1 ? styles[0] : undefined,
    variable,
    adjustFontFallback: adjustFontFallbackMetrics,
}

위에서 호출하는 calculateSizeAdjustValues라는 함수는 다음과 같이 생겼는데, 넘겨준 fontMetrics의 category값이 "serif" 이면 Times New Roman을, "sans serif" 이거나 "serif"가 아니면 Arial을 fallback으로 설정합니다.
// packages/next/server/font-utils.ts
export const DEFAULT_SERIF_FONT = {
  name: 'Times New Roman',
  xAvgCharWidth: 821,
  azAvgWidth: 854.3953488372093,
  unitsPerEm: 2048,
}
export const DEFAULT_SANS_SERIF_FONT = {
  name: 'Arial',
  xAvgCharWidth: 904,
  azAvgWidth: 934.5116279069767,
  unitsPerEm: 2048,
}

export function calculateSizeAdjustValues(fontMetrics: any) {
  let { category, ascent, descent, lineGap, unitsPerEm, azAvgWidth } =
    fontMetrics
  const fallbackFont =
    category === 'serif' ? DEFAULT_SERIF_FONT : DEFAULT_SANS_SERIF_FONT

  const mainFontAvgWidth = azAvgWidth / unitsPerEm
  const fallbackFontAvgWidth = fallbackFont.azAvgWidth / fallbackFont.unitsPerEm
  let sizeAdjust = azAvgWidth ? mainFontAvgWidth / fallbackFontAvgWidth : 1

  ascent = formatOverrideValue(ascent / (unitsPerEm * sizeAdjust))
  descent = formatOverrideValue(descent / (unitsPerEm * sizeAdjust))
  lineGap = formatOverrideValue(lineGap / (unitsPerEm * sizeAdjust))

  return {
    ascent,
    descent,
    lineGap,
    fallbackFont: fallbackFont.name,
    sizeAdjust: formatOverrideValue(sizeAdjust),
  }
}
위 함수에 fontMetrics로 넘겨주는 값은 다음과 같이 하드코딩된 JSON map의 형태로 저장되어 있습니다. 즉 next는 size-adjust를 수행하기 위해서 필요한 값들을 자신들이 지정한 fallback font인 Times new Roman과 Arial에 대해 모두 기록해 놓고 빌드 시에 이 값을 불러와서 size-adjust 값을 계산한 뒤 사용하는 것입니다.
// packages/next/server/google-font-metrics.json
...
"Noto Sans Lao": {
    "category": "sans-serif",
    "ascent": 1183,
    "descent": -462,
    "lineGap": 0,
    "xAvgCharWidth": 556,
    "unitsPerEm": 1000,
    "azAvgWidth": 485.8139534883721
},
"Homemade Apple": {
    "category": "handwriting",
    "ascent": 1327,
    "descent": -866,
    "lineGap": 18,
    "xAvgCharWidth": 567,
    "unitsPerEm": 1024,
    "azAvgWidth": 573.6976744186046
},
"Noto Sans Ogham": {
    "category": "sans-serif",
    "ascent": 1069,
    "descent": -293,
    "lineGap": 0,
    "xAvgCharWidth": 538,
    "unitsPerEm": 1000,
    "azAvgWidth": 552.5581395348837
},
...
download fonts
Homemade Apple 폰트에 대한 fallback 폰트를 정하고, 이 폰트에 대해 zero-layout-shift를 구현하기 위한 size-adjust 과정이 마무리된 뒤에는 실제로 Homemade Apple 폰트를 빌드 타임에 다운로드 받아서 .next/static/media 하위에 저장해야 합니다. 폰트를 다운로드하기 위해서는 우선 @font-face로 구성된 css 파일을 먼저 다운로드한 뒤, 이 파일에 명시된 font들을 다운로드해야 합니다.
이를 위해 먼저 Map 객체로 구성된 cssCache map에 해당 폰트에 대한 cache가 있는지를 먼저 확인합니다. cache가 없는 경우 fetch api를 사용해서 직접 해당 폰트에 대한 css(@font-face로 구성된)를 다운받아 옵니다.
const hasCachedCSS = cssCache.has(url)
let fontFaceDeclarations = hasCachedCSS
  ? cssCache.get(url)
  : await fetchCSSFromGoogleFonts(url, fontFamily).catch(() => null)
if (!hasCachedCSS) {
  cssCache.set(url, fontFaceDeclarations)
} else {
  cssCache.delete(url)
}
if (fontFaceDeclarations === null) {
  nextFontError(`Failed to fetch \`${fontFamily}\` from Google Fonts.`)
}

// packages/font/src/google/utils.ts
export async function fetchCSSFromGoogleFonts(url: string, fontFamily: string) {
    let cssResponse
    const res = await fetch(url, {
      headers: {
        // The file format is based off of the user agent, make sure woff2 files are fetched
        'user-agent':
          'Mozilla/5.0 (Macintosh; Intel Mac OS X 10_15_7) AppleWebKit/537.36 (KHTML, like Gecko) Chrome/104.0.0.0 Safari/537.36',
      },
    })
    cssResponse = await res.text()
    return cssResponse
}
다음으로는 받아온 @font-facae css 파일을 바탕으로 실제 폰트 파일(대개 woff2 format)을 다운받아 옵니다. 이 폰트 파일 또한 @font-face css파일과 마찬가지로 cache에 값이 있는지를 확인하는 단계를 거칩니다.
폰트 파일을 받아온 이후에는 이 파일을 로컬 디렉토리인 .next/static/media 하위에 저장하고, fontFaceDeclarations(@font-face css파일)에 google도메인을 바라보고 있는 스트링 값들을 전부 방금 폰트 파일을 저장한 로컬 디렉터리를 바라보도록 수정해 줍니다.
// CSS Variables may be set on a body tag, ignore them to keep the CSS module pure
fontFaceDeclarations = fontFaceDeclarations.split('body {')[0]

// Find font files to download
const fontFiles: Array<{
  googleFontFileUrl: string
  preloadFontFile: boolean
}> = []
let currentSubset = ''
for (const line of fontFaceDeclarations.split('\n')) {
  // Each @font-face has the subset above it in a comment
  const newSubset = /\/\* (.+?) \*\//.exec(line)?.[1]
  if (newSubset) {
    currentSubset = newSubset
  } else {
    const googleFontFileUrl = /src: url\((.+?)\)/.exec(line)?.[1]
    if (
      googleFontFileUrl &&
      !fontFiles.some(
        (foundFile) => foundFile.googleFontFileUrl === googleFontFileUrl
      )
    ) {
      fontFiles.push({
        googleFontFileUrl,
        preloadFontFile:
          !!preload && (callSubsets ?? subsets).includes(currentSubset),
      })
    }
  }
}

// Download font files
const downloadedFiles = await Promise.all(
  fontFiles.map(async ({ googleFontFileUrl, preloadFontFile }) => {
    const hasCachedFont = fontCache.has(googleFontFileUrl)
    const fontFileBuffer = hasCachedFont
      ? fontCache.get(googleFontFileUrl)
      : await fetchFontFile(googleFontFileUrl).catch(() => null)
    if (!hasCachedFont) {
      fontCache.set(googleFontFileUrl, fontFileBuffer)
    } else {
      fontCache.delete(googleFontFileUrl)
    }
    if (fontFileBuffer === null) {
      nextFontError(`Failed to fetch \`${fontFamily}\` from Google Fonts.`)
    }

    const ext = /\.(woff|woff2|eot|ttf|otf)$/.exec(googleFontFileUrl)![1]
    // Emit font file to .next/static/media
    const selfHostedFileUrl = emitFontFile(
      fontFileBuffer,
      ext,
      preloadFontFile
    )

    return {
      googleFontFileUrl,
      selfHostedFileUrl,
    }
  })
)

// Replace @font-face sources with self-hosted files
let updatedCssResponse = fontFaceDeclarations
for (const { googleFontFileUrl, selfHostedFileUrl } of downloadedFiles) {
  updatedCssResponse = updatedCssResponse.replace(
    new RegExp(escapeStringRegexp(googleFontFileUrl), 'g'),
    selfHostedFileUrl
  )
}

return {
  ...result,
  css: updatedCssResponse,
}
wrap-up
지금까지 downloadGoogleFonts 함수가 하는 역할에 대해 살펴보았습니다. 정리하면 다음과 같습니다. (아래의 모든 과정은 빌드 타임에 일어난다는 사실을 기억해 주세요)
- 사용자가 입력한 폰트를 key로 해서 하드코딩된 google-font-metrics.json파일의 JSON Map으로부터 Value를 읽어옴.
- 이 Value에는 해당 폰트의 카테고리(Serif, Sans Serif..), size-adjust 계산을 위한 여러 metric들이 들어 있음. 이 값들을 사용해서 사용자가 입력한 폰트와 fallback font의 사이즈를 조정해서 zero-layout-shift가 발생하지 않도록 맞춰줌.
- 다음으로는 실제로 폰트를 다운로드하는 단계. 먼저 @font-face가 정의된 css파일을 먼저 다운로드하고, 이 파일 안에 들어있는 실제 폰트 파일들 (woff2, woff)을 다운로드함. (이때 캐시가 있으면 캐시를 사용함.) 실제 폰트 파일을 로컬 파일 시스템에 저장한 뒤에 @font-face가 정의된 파일이 이 로컬 파일 시스템의 디렉터리를 가리키기도록 String Replace를 수행함.
- 이 값을 리턴함.
이제 다음은 postcss-next-font를 간단하게 살펴봄으로써, 위에서 다운로드한 폰트와 css파일을 어떻게 className과 css에 바인딩하는지를 살펴보도록 하겠습니다.
postcss-next-font
postcssNextFontPlugin함수가 하는 일은 결국 아래의 css파일을 생성하는 것입니다. 위의 Next13 예제에서 생성된. next/static/css 디렉터리 안에 들어있는 파일을 의미하며 이 파일은 아래와 같이 HTML의 head에 link의 형태로 들어가게 됩니다. 즉, HTML 파일에 link로 들어가 있는 @font-face css파일은 postcssNextFontPlugin에 의해서 생성된 것이며, 생성된 css 파일은 로컬 파일 시스템에 다운로드된 googleFont를 가리키고, 이 css 파일 안에는 미리 계산된 size-adjust와 같은 값들이 들어 있어서 zero-layout-shift를 가능하게 만드는 것입니다.


postcss-next-font안에 있는 postcssNextFontPlugin 함수는 downloadGoogleFonts의 결과로부터 실행됩니다. 함수를 실행하기 전에 nextFontLoader에서 fontFamilyHash 값을 생성하는데, 이 값이 위의 예시에서 보았던 className의 hash값이 됩니다.
// nextFontLoader
const fontFamilyHash = loaderUtils.getHashDigest(
    Buffer.from(css),
    'md5',
    'hex',
    6
)
// Add CSS classes, exports and make the font-family localy scoped by turning it unguessable
const result = await postcss(
    postcssNextFontPlugin({
      exports,
      fontFamilyHash,
      fallbackFonts,
      weight,
      style,
      adjustFontFallback,
      variable,
    })
).process(css, {
    from: undefined,
})
postcssNextFontPlugin은 fontFamilyHash와 fontFamily Name으로부터 가공된 이름을 생성합니다. (아래 그림에서 __Homemade_Apple_bd05f8), 이 값은 css font-family 값으로 들어가게 됩니다. 이렇게 formatFamily를 거쳐 사용될 이름의 hash 값을 생성한 뒤에는, 이전 downloadGoogleFonts에서 처리한 size-adjust와 같은 값들을 css에 반영하는 단계를 거치게 되고, font-family, font-weight, font-style값까지 모두 css 파일에 반영한 뒤에 리턴하게 됩니다.

  const formatFamily = (family: string) => {
    // Turn the font family unguessable to make it localy scoped
    return `'__${family.replace(/ /g, '_')}_${fontFamilyHash}'`
  }

  let adjustFontFallbackFamily: string | undefined
  if (adjustFontFallback) {
    adjustFontFallbackFamily = formatFamily(`${fontFamily} Fallback`)
    const fallbackFontFace = postcss.atRule({ name: 'font-face' })
    const {
      fallbackFont,
      ascentOverride,
      descentOverride,
      lineGapOverride,
      sizeAdjust,
    } = adjustFontFallback
    fallbackFontFace.nodes = [
      new postcss.Declaration({
        prop: 'font-family',
        value: adjustFontFallbackFamily,
      }),
      new postcss.Declaration({
        prop: 'src',
        value: `local("${fallbackFont}")`,
      }),
      ...(ascentOverride
        ? [
            new postcss.Declaration({
              prop: 'ascent-override',
              value: ascentOverride,
            }),
          ]
        : []),
      ...(descentOverride
        ? [
            new postcss.Declaration({
              prop: 'descent-override',
              value: descentOverride,
            }),
          ]
        : []),
      ...(lineGapOverride
        ? [
            new postcss.Declaration({
              prop: 'line-gap-override',
              value: lineGapOverride,
            }),
          ]
        : []),
      ...(sizeAdjust
        ? [
            new postcss.Declaration({
              prop: 'size-adjust',
              value: sizeAdjust,
            }),
          ]
        : []),
    ]
    root.nodes.push(fallbackFontFace)
  }

  const formattedFontFamilies = [
    formatFamily(fontFamily),
    ...(adjustFontFallbackFamily ? [adjustFontFallbackFamily] : []),
    ...fallbackFonts,
  ].join(', ')

  // Add class with family, weight and style
  const classRule = new postcss.Rule({ selector: '.className' })
  classRule.nodes = [
    new postcss.Declaration({
      prop: 'font-family',
      value: formattedFontFamilies,
    }),
    ...(weight && !isRange(weight)
      ? [
          new postcss.Declaration({
            prop: 'font-weight',
            value: weight,
          }),
        ]
      : []),
    ...(style && !isRange(style)
      ? [
          new postcss.Declaration({
            prop: 'font-style',
            value: style,
          }),
        ]
      : []),
  ]
  root.nodes.push(classRule)
Conclusion
지금까지 @next/font가 어떻게 구현되었는지를 살펴봄으로써, 어떻게 next가 font optimization을 내부적으로 수행하는지에 대해서 살펴보았습니다. 핵심 아이디어를 정리하면 다음과 같습니다.
- font optimization은 빌드 타임에 webpack custom loader를 통해 수행한다.
- zero-layout-shift를 구현하기 위해 next는 Serif / Not Serif의 2가지 Default Fallback Font를 지정하고 있고(Times New Roman, Arial) 이 두 폰트에 대한 다른 모든 구글 폰드의 size-adjust 계산을 위한 값들이 하드코딩되어 있는 font-metrics map을 내부적으로 가지고 있다.
- 이 map을 사용해서 fallback폰트와 사용자가 사용하려는 폰트 사이의 size-adjust를 수행해서 zero-layout-shift를 구현하고, 빌드 타임에 구글 폰트를 다운로드하여 로컬 디렉터리(. next/static/media)에 저장한다.
- 이제 @font-face가 포함된 css 파일을 생성해야 하는데, 이는 postcssNextFontPlugin에서 수행하며, fontFamily의 hash 값과 이전 단계에서 계산한 adjustFallbackFont의 여러 값들을 css파일에 매핑한다.
- 이 css파일은 HTML의 head tag안에 존재하며, @font-face를 가리키는 css파일과, css파일이 가리키는 font 파일이 모두 local directory에 있기 때문에 Same-origin이며, 기존에 연결되어 있던 connection을 그대로 사용할 수 있다.
Reference
https://nextjs.org/docs/api-reference/next/font
https://nextjs.org/docs/basic-features/font-optimization
https://www.lydiahallie.io/blog/optimizing-webfonts-in-nextjs-13
https://fonts.google.com/knowledge/glossary/fout
'Frontend' 카테고리의 다른 글
| Suspense Deep Dive (Code Implementation) (0) | 2023.03.26 |
|---|---|
| Concept of React Scheduler (0) | 2023.01.14 |
| React Mount System Deep Dive (Sync Mode) (5) | 2023.01.08 |
| Node.js + Puppeteer Memory Leak Handling (2) | 2022.11.20 |
| Suspense SSR Architecture in React 18 (1) | 2022.09.18 |